
Welcome, photographers! 👋
We’re so excited to introduce a new blog series and section of our website directed specifically toward you! Over the years, we’ve developed systems and tips that have helped us grow and manage our wedding business. Now we’ve pulled back the curtain and created our Education Page for Photographers, our Photographers Newsletter (sign up here!) and our “For Photographers” blog series!
Wedding photography, in the most strict sense of the phrase, is a creative and artistic outlet. Most photographers thrive on the creative and experimental aspect of what they do. They love shooting weddings and interacting with their couples and using their craft to create beautiful images, but when it comes time to empty the memory cards and begin sorting through the wedding day, they’d rather stand in line for 4 hours at the DMV. When we began this journey, we realized that we absolutely could not be lackadaisical about the back-end of our business – culling, organizing, editing, exporting/uploading, and delivering the product. Things like that are the gas and oil that keep our business running, not stalled on the side of the road.
One of our mottos to keep post-processing from becoming too overwhelming is to “get it right in-camera.” We’ve all heard that, right? Taking time to get things like exposure, in-camera cropping, white balance, etc. near perfect in camera will keep you from slaving away hours in Lightroom trying to “fix” rather just “enhancing” the image. Let’s take that approach a few step farther, shall we? There are many things you can do before you actually begin to edit and while you’re editing to keep you from pulling your hair out later.
Here are 6 tips to help you get a considerable amount of your time back and help your creative mind rest a little easier through the post-processing process. Say that five times fast.
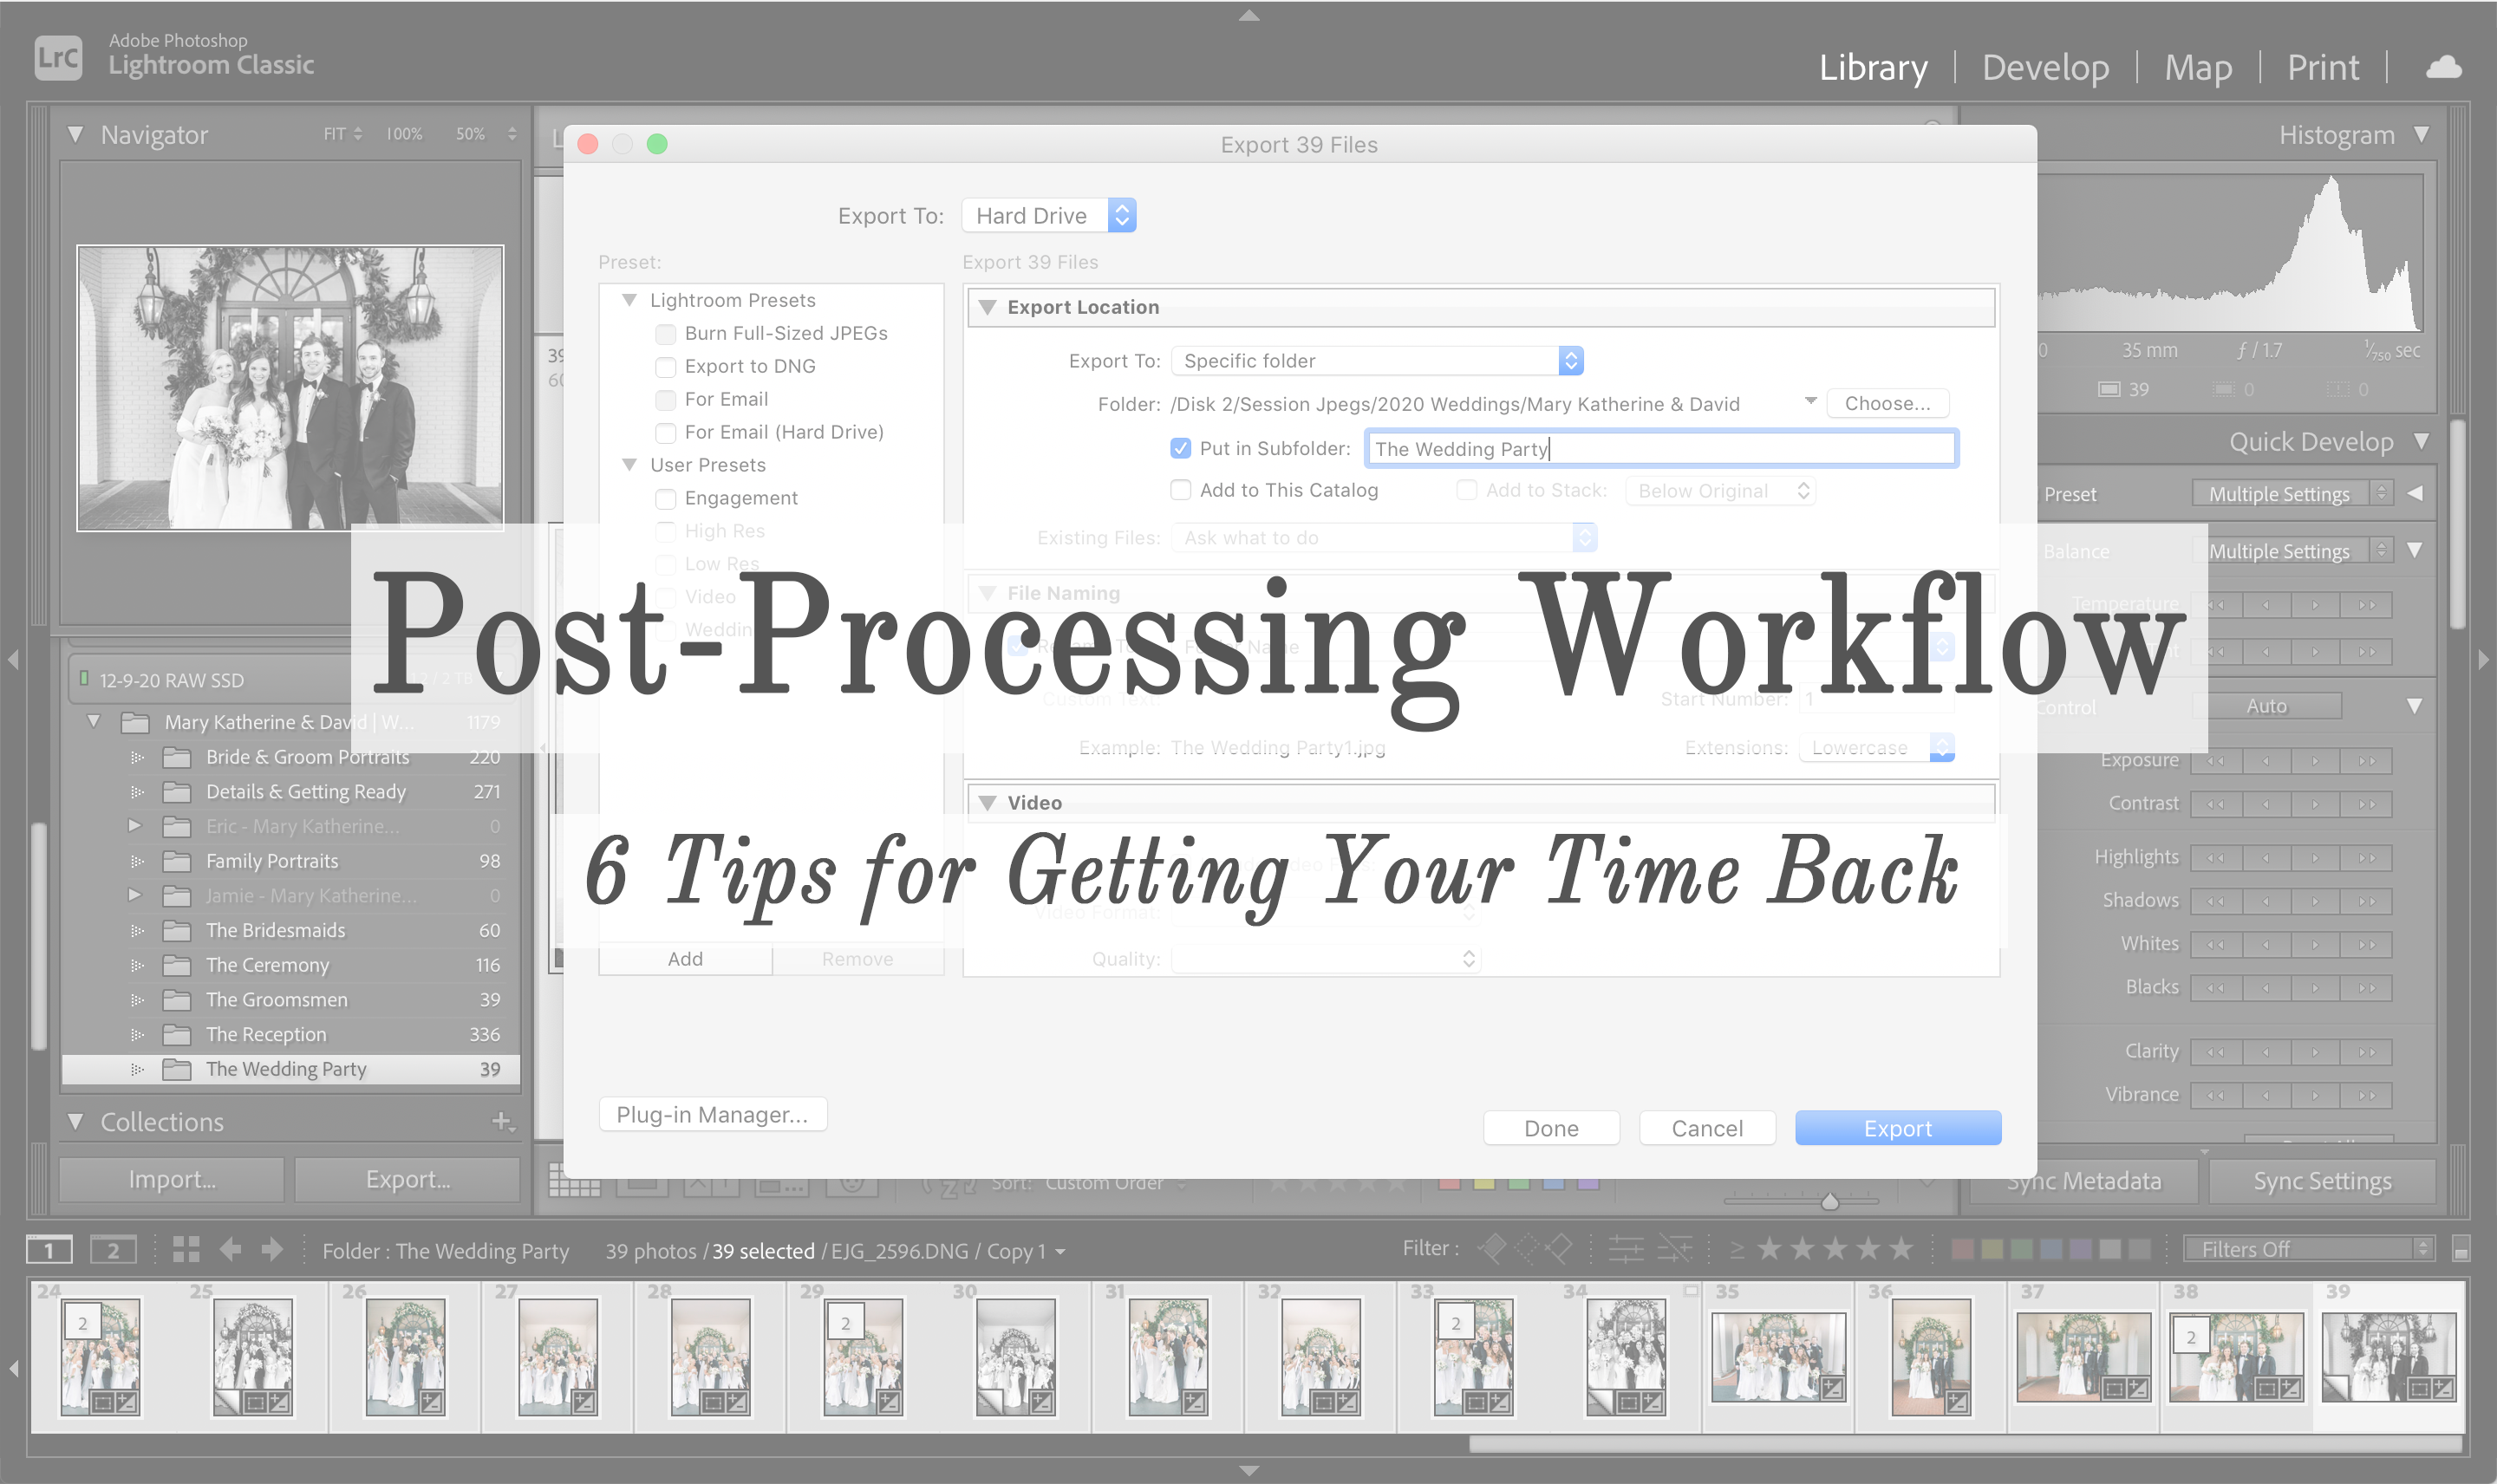
1) Use Photo Mechanic
Why? It’s FAST. We used to cull in Lightroom, and to be honest, we dreaded it. The time it takes Lightroom to render an image so you can see it clearly is pretty sluggish. The reason for this is, Lightroom renders the whole RAW file (which is very large) before it clears up and gives you a preview. Photo Mechanic, on the other hand, loads the embedded Jpeg preview of the RAW file (this is the image you see on your LCD screen of your camera after you take a photo) which is SIGNIFICANTLY smaller than the actual RAW file. Where Lightroom might take 2 seconds to render an image, Photo Mechanic is virtually instant. And when you’re sorting through a few thousand photos from a wedding day, that makes all the difference in the world. (Full disclaimer. Photo Mechanic is not free. It is a $150 program. But, we say take our $150 NOW, you wizard software!)
2) Cull Your Cards Separately
This only applies if you have a second shooter on the wedding day. Let’s assume you do. On the typical wedding day, we aren’t together for the majority of the pre-ceremony stuff. Eric is shooting details while Jamie is getting candid photos of the girls getting ready, then Eric is grabbing shots of the guys getting ready while Jamie is getting the finishing touches of the bride putting on her dress, and so on. Plowing through a hodge-podge of multiple scenes of the day at one time can make you want to throw your computer out the window. But when we cull through Eric’s photos, then Jamie’s photos, we get a smooth flow of the wedding day without seeing a ring shot, then a shot of the bride getting her makeup done, then a shot of the invitations, then the bridesmaids toasting their mimosas. It’s cohesive, and it makes the process SO much quicker.
3) Organize Your Photos Into Categories BEFORE You Edit Them
After we cull through the images and have made our selections (for Photo Mechanic users, we “tag” our photos we want to keep by pressing T on the keyboard), we filter those photos by only viewing the ones we tagged. We then create subfolders within the master wedding folder for the different sections of the day (getting ready, couples portraits, wedding party, etc.). Since we’re looking at our photos separately (see tip #2), we highlight the photos from each section and drag them to their appropriate folder. See how this overwhelming stack of wedding photos is getting much more manageable? From there, all we have to do is select the folders and literally just drag them into Lightroom and import. The images remain categorized once they’re in your Lightroom Catalog. Easy peasy!
Note: This CAN be done in Lightroom if you don’t have Photo Mechanic. Our main point is to have your photos organized into folders so you don’t have a thousand or so photos staring you in the face being all intimidating and stuff.
4) Edit Your Photos Starting With the Largest Folder First
At the beginning of our business, we edited weddings chronologically. It just made sense. But after really analyzing the process, we found that if you begin editing the day starting with the largest folders first, working our way down, it became a motivator! Once you get to the smaller folders, you can edit 4 or 5 sections of the wedding day in no time, and that makes you feel super accomplished and deserving of a cookie. Using this method, we found ourselves getting a lot more done in one sitting and eating a lot more cookies.
5) Don’t Wait to Export
Instead of waiting until you’re done editing the entire wedding to export your photos, try exporting them when you’ve got a little bit of time away from the computer. Throughout your day, life happens. You eat lunch, you run errands, you take the kids to soccer practice, you binge watch Bridgerton for 4 hours and forget what day it is. The point is, you aren’t glued to your computer every minute of the day. If you’ve edited 3 sections of a wedding and need to eat, export those sections while you’re taking a break. Your computer doesn’t need as many breaks as you do, so keep making it work for you while you’re out.
Another note: Export the images into folders with the same name as you edited them in. For example, we have a master folder called “Glenn & Maggie’s Wedding,” and if we’re ready to export “The Details” folder we just edited, we tell Lightroom to create a subfolder called “The Details” within “Glenn & Maggie’s Wedding.” We do this because it will…
6) Save Time Uploading Images to Your Client’s Gallery
We use Cloudspot as our image delivery system, and there are so many reasons why we love it. One huge reason is that it remembers your folder system that you’ve created so you don’t have to organize your images within the program. Since we now have a master folder called Glenn & Maggie’s Wedding and subfolders of edited images, all we have to do is create a new gallery, fill out our client’s info and drag our subfolders into the uploader and watch it do its thing! We absolutely LOVE Cloudspot!
We’re always on the lookout for ways to make our business a well-oiled machine so that we can spend more time loving on our couples, spending time with our daughter and friends, or binge watching Selling Sunset. These steps have helped us do all of that so that we’re not chained to our computers more than we have to be.
If these steps help you at all or if you have any questions, we’d love to hear from you! Connect with us in our exclusive Facebook community for photographers: Eric & Jamie’s Photography Community and check out more information on our Education Page for Photographers. Now, get out there and take your life back!


+ COMMENTS
add a comment